Customize user interfaces with the style editor
Role:Administrator
Minimum Version:Ivanti Neurons for ITSM 2023.3.
An administrator can configure and customize the UI for Self Service user roles in Style Editor. This includes:
•Assigning a UI version and theme
•Customizing the login and application pages
•Setting up the exceptions for the roles
The Style Editor consists of three main sections:
•Login Page – Customize the login screen appearance for the roles.
•All Pages – Apply default styling for pages used by Self Service Users
•Exceptions/Custom Roles – Create and manage UI settings.
Modify and save one option at a time. The system supports only one change per instance, so avoid editing the same role simultaneously.
In the Login Page section, you can customize the layout, add your company logo or background image, modify text styles, and configure fields based on your requirements for all UI versions. These options give you the flexibility to design the login experience according to your preferences and align it with your brand identity.
To modify the appearance of the login page, do the following:
1.In the Login Page section, click the Edit  icon.
icon.
2.Modify any of the following options and after each change, click OK:
•Common - Customize the layout of the login access page, including text and hyperlink colors.
•Background - Change the login window’s background color or upload a custom background image.
•Title - Display or hide the title, set custom title text (e.g., your company name), and adjust its text size.
•Logo - Upload and display your company or specific logo, and scale it to fit your needs.
•Form - Customize color of the text you enter, the background color and border of the input fields, the size of the entered text, and the text color of the field labels. Additionally, you can change the button’s background color and the color of its text.
•Copyright - Add or modify copyright text and adjust the colors of text and hyperlinks.
3.Click revert ![]() icon, to restore the original settings for any modifications made.
icon, to restore the original settings for any modifications made.
4.Click Save.
5.To restore the default login page view, click Revert All.
6.To return to main style editor screen, click Back to list view.
Refer to Styling the Login Page. For information on making color changes, refer to Working with Colors in the Style Editor.
You can customize the All Pages for the required role. Any changes made to the default role will apply to all roles, you can select the self service role to modify individually. For more information on user roles, see Styling the Neurons for ITSM Console.
The default options are:
•UI: UI v1 (formerly Classic)
•Theme: CDL2
To customize All Pages for a role:
1.Click Edit icon.
The Style Editor window is displayed.
2.Select a role from the Role dropdown list.
3.Select theme from Select theme link.
4.Modify the color for the required options and you can see the preview in the right panel.
5.Click revert ![]() icon, to restore the original settings for any modifications made.
icon, to restore the original settings for any modifications made.
6.Click Save.
7.To restore the default page view, click Revert All.
8.To view main editor screen, select Back to list view.
Use the Exceptions/Custom Roles section to modify default settings for roles such as Self Service, IT Services, Mobile Analyst and others. The table below outlines the field and its description as shown on the screen.
View Custom Roles
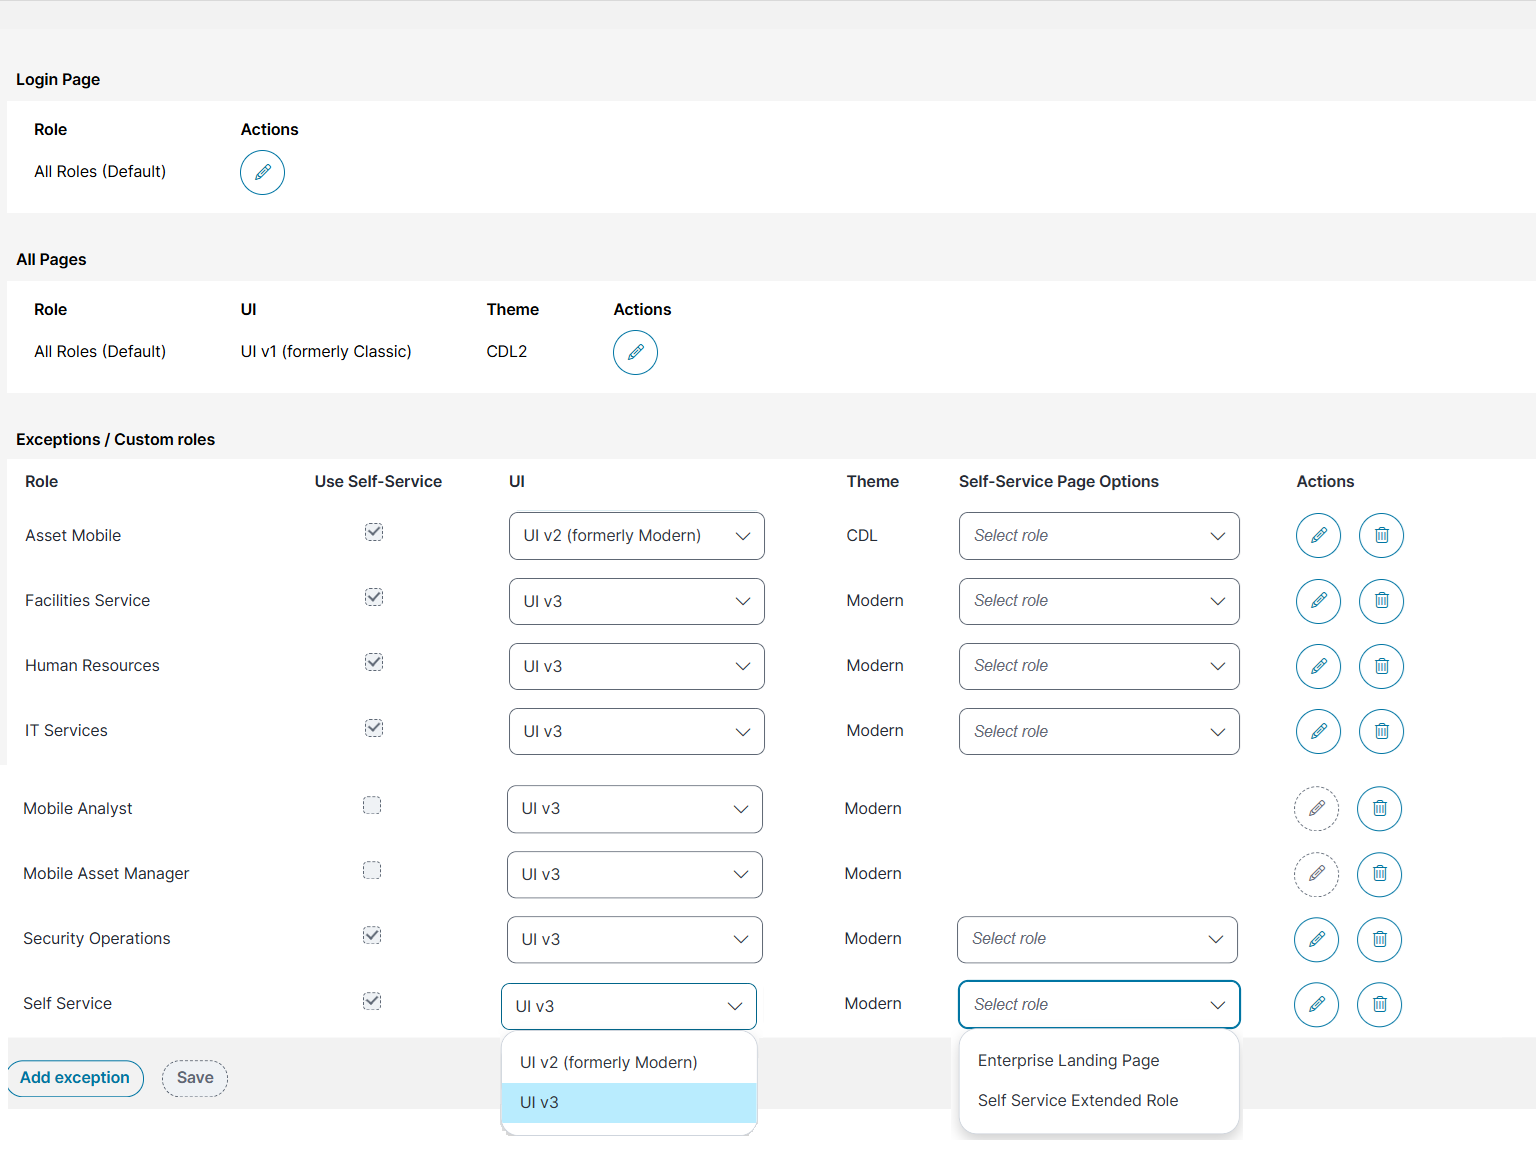
| Field | Description |
|---|---|
| Role | Displays the name of the role for which you can modify the UI version and theme. |
| Use Self Service | Select the checkbox to enable Self Service features for applicable roles. |
| UI |
Select a UI version from the dropdown list: •UI v2 (Modern) •UI v3 (Self Service Management v3) |
| Theme |
Automatically assigned according to the selected UI. •CDL (for UI v2) •Modern (for UI v3) |
| Self service Page Options |
Select the landing page for self service roles from the dropdown list: •Enterprise Landing Page - Select this option to navigate between various Self-Service portals, based on the selections made in the Exceptions/Custom Roles section. •Self Service Extended Role - Select this option to display the Self-Service role as a single option on the home page. |
| Actions |
•Click the Edit •Click the Delete |
 icon to remove the role from the
 Use the Custom Role Exception feature to supersede default role based configurations and get control over user access and interface behavior.
To add or modify exception for any role:
1.In the Exceptions/Custom Roles section, click Add exception.
2.For Self Service roles:
•Toggle on the Use Self Service.
•Select UI v2 or UI v3 from UI dropdown list.
•If UI v2 is selected, select below options from Self Service Page Options dropdown list:
•Enterprise Landing Page
•Self Service Extended Role
3. For non Self Service roles, select the appropriate UI and click Save.
If the newly created role does not appear in the administrator dropdown list or fails to apply to the selected UI, add the exception to the role again.